In the world of cybersecurity, honeypots are a powerful tool for detecting and mitigating cyber threats. A honeypot is a decoy system that is designed to look and act like a legitimate system, with the goal of luring attackers into revealing their tactics and techniques. This can provide valuable insights into the types of attacks that are being launched against an organization, as well as help identify vulnerabilities that can be patched to prevent future attacks.
The benefits of using honeypots for the security of a company are numerous. Honeypots can help organizations identify threats that may have gone unnoticed, as well as provide early warning of attacks in progress. They can also be used to gather intelligence about attackers and their techniques, which can be used to improve an organization's overall security posture. Additionally, honeypots can be used to divert attackers away from critical systems, giving security teams more time to respond and mitigate the threat.
There are many different types of honeypots available, each with its own strengths and weaknesses. Here are five of the most commonly used honeypot solutions, along with a brief description of each:
-
Honeyd: A versatile honeypot that can simulate a wide range of systems and services.
-
Dionaea: A honeypot that specializes in detecting and analyzing malware.
-
Kippo: A honeypot that is designed to mimic SSH services and gather intelligence about attackers who are attempting to brute-force login credentials.
-
Cowrie: A fork of Kippo that has been updated with new features and improved performance.
-
Glastopf: A honeypot that is designed to emulate vulnerable web applications and gather intelligence about attackers who are attempting to exploit them.
As you can see from the list, there are honeypots that emulate one or multiple services, because a honeypot works by presenting attackers with a tempting target that appears to be a legitimate system. The honeypot is set up to mimic the behavior of a real system, with open ports, vulnerable software, interactive prompts and other characteristics that might attract attackers. Once an attacker engages with the honeypot, it logs their activity and can capture information about the attacker's tactics and techniques. This information then is presented to the user through logs and/or interfaces that can be searched and can produce statistics so the user can take manual or automatic actions.
Honeypots can be configured in a variety of ways, depending on the needs of the organization. A basic honeypot might simply emulate a single service, such as an open SSH port, while a more complex honeypot might simulate an entire network of systems, including web servers, email servers, and databases. Honeypots can be configured to capture various types of data, including network traffic, file activity, and system logs. The captured data can then be analyzed to identify patterns and detect anomalies that may indicate an attack is in progress. Honeypots can also be customized with specific rules and behaviors, such as mimicking different types of operating systems or simulating user behavior, to make them more effective at detecting attacks. Ultimately, honeypots can be tailored to meet the specific needs of an organization, providing a flexible and powerful tool for improving security.
What is T-POT?
T-POT is a comprehensive honeypot solution that is designed to simplify the process of deploying and managing honeypots. It is an all-in-one tool that includes multiple honeypots, security tools, and data analysis tools. T-POT is maintained by the Honeynet Project, a non-profit organization dedicated to improving internet security.
T-POT stands out from other honeypot solutions because of its flexibility and ease of use. It includes a wide range of pre-configured honeypots, such as Dionaea, Cowrie, and Glastopf, as well as other security tools like Suricata and the ELK stack. T-POT is also designed to be customizable, allowing organizations to tailor their honeypot deployments to meet their specific needs. This makes it a powerful tool for improving threat intelligence capabilities and identifying and mitigating cyber threats. Additionally, T-POT is open-source software, which means that it is free to use and can be modified to meet the unique needs of individual organizations.
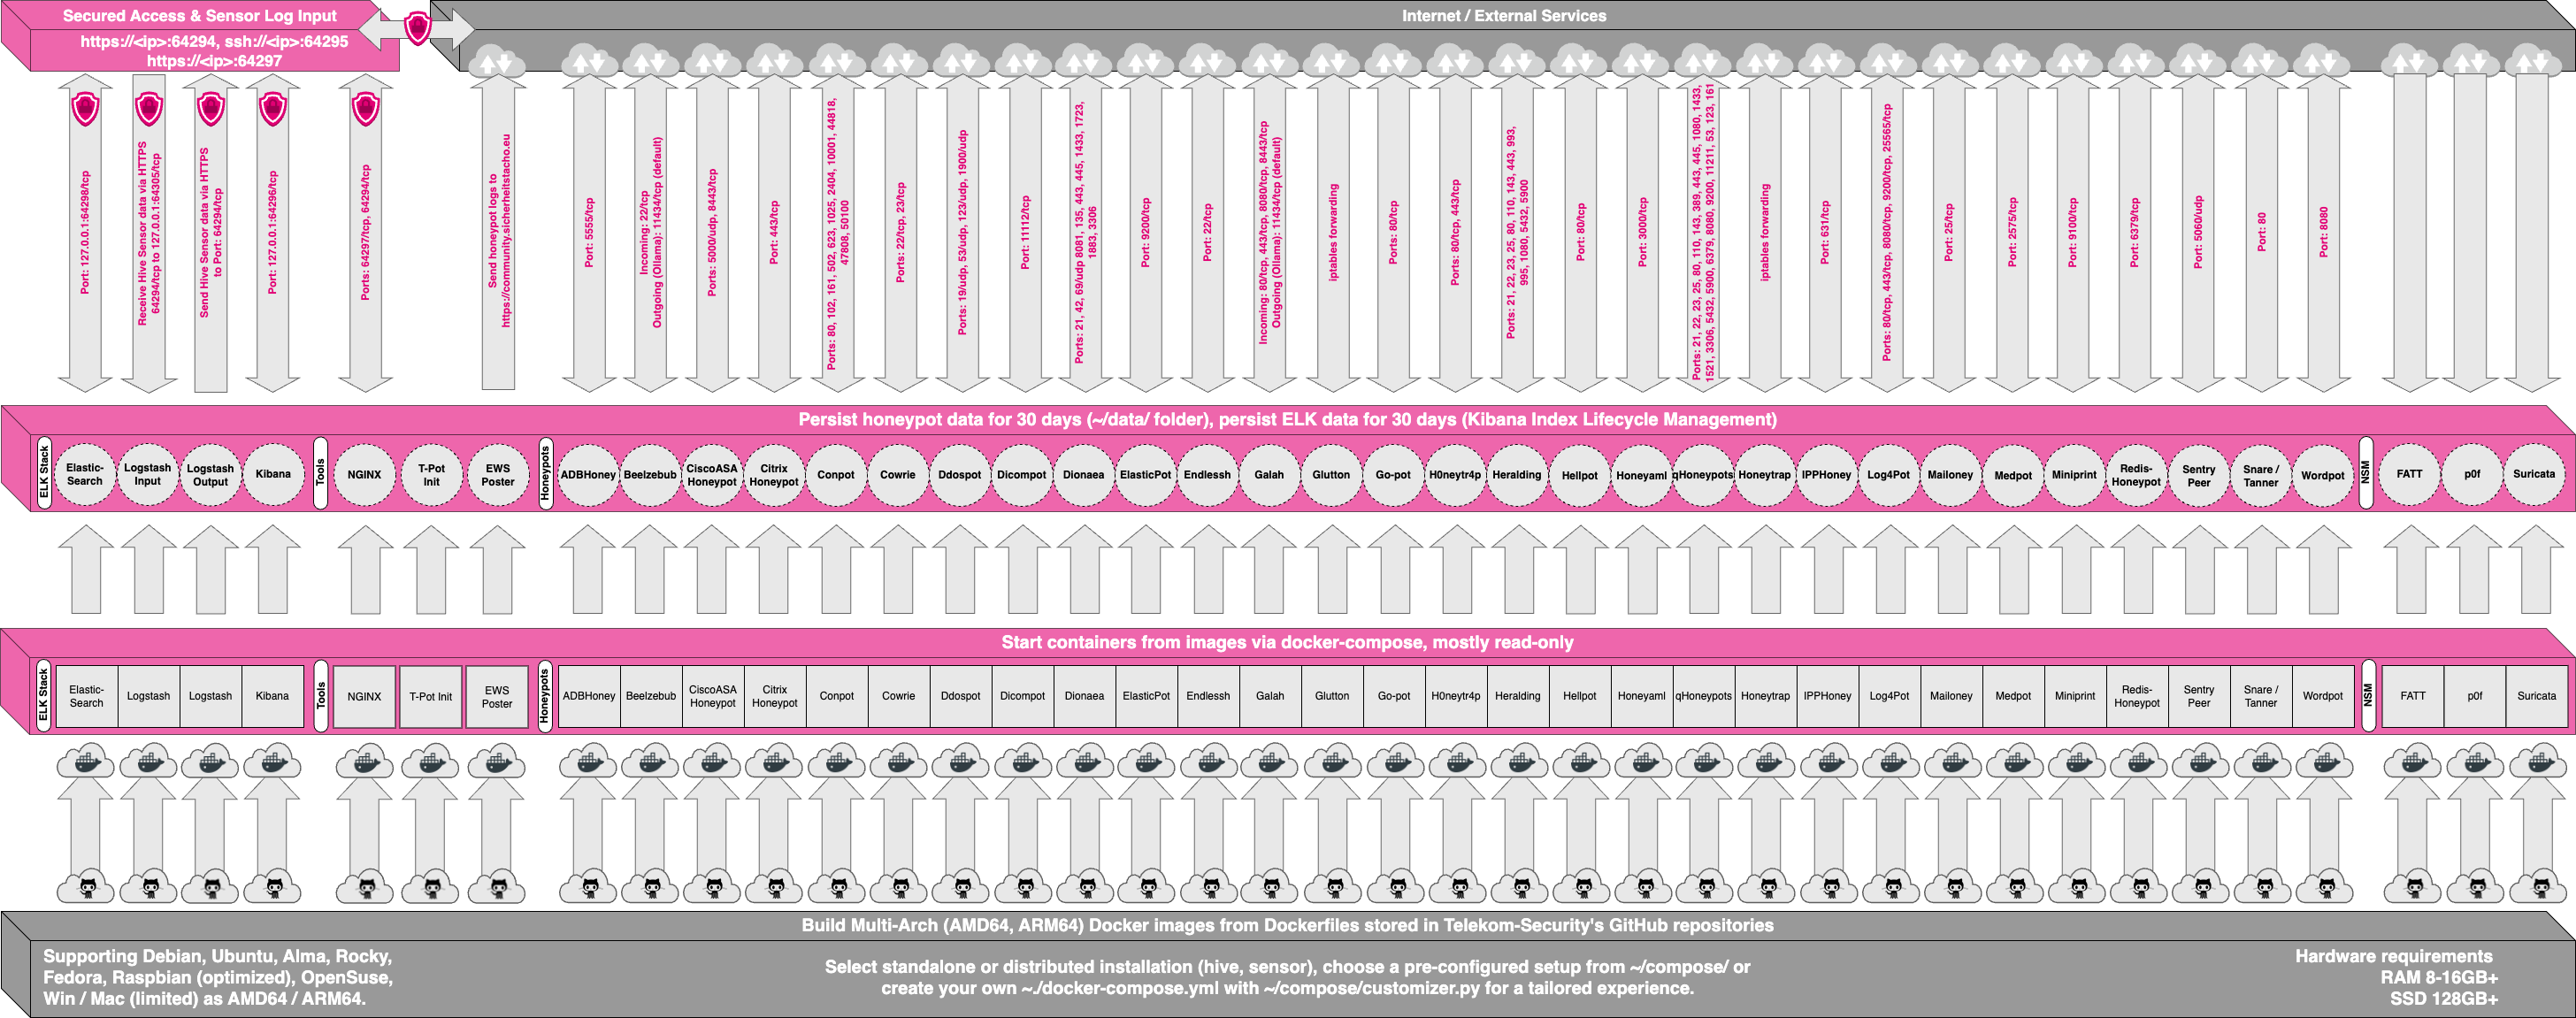
T-POT Architecture
T-POT is designed as a modular system that can be easily extended with additional components and tools. At its core, T-POT is built on top of a Debian operating system and includes multiple pre-configured honeypots, security tools, and data analysis tools. The honeypots can be deployed individually or together as part of a honeynet, depending on the specific security needs of the organization. In addition to the honeypots, T-POT also includes various security tools such as Suricata, p0f and the ELK stack for log management and analysis.
T-POT is designed to be flexible and customizable, allowing organizations to tailor their honeypot deployments to meet their specific needs. For example, users can add or remove components from T-POT based on their individual requirements, and can also create custom honeypots or modify existing ones to better suit their needs. Each honeypot and tool in T-POT is isolated within its own Docker container. A container is a lightweight virtualization technology that allows multiple applications to run on a single operating system without interfering with each other. By running each honeypot and tool in a separate container, T-POT ensures that they are fully isolated from each other, and that any compromise of one container does not affect the security of the others.
Moreover, the use of containers allows for easy deployment, management, and scaling of the different components of T-POT. Each container has its own environment and dependencies, making it easier to manage and update the different components of T-POT. This also enables T-POT to be easily moved between different environments and platforms, without any major changes or reconfigurations.
T-POT uses a shared volume to persist all the data that is used by the ELK (Elasticsearch, Logstash, Kibana) stack. This volume is mounted in all the containers that need to access the ELK stack data, including the honeypots and data analysis tools. By sharing this volume between all the containers, T-POT ensures that the ELK stack data is always accessible and consistent, regardless of which container is being used.
The shared volume in T-POT is implemented using Docker volumes. Docker volumes allow data to be stored outside the container file system and be shared between multiple containers. In T-POT, the shared volume is created using the Docker volume command, and is mounted in all the containers that require access to the ELK stack data.
When running T-POT, the honeypot services are exposed to the internet through port forwarding. In T-POT, the honeypot services are configured to use specific ports that are forwarded to the host machine's IP address. For example, the SSH honeypot may be configured to use port 22, which is then forwarded to the host machine's IP address.
Once the honeypot services are exposed to the internet, they can be accessed by attackers, who may attempt to interact with the honeypots as if they were real systems. By monitoring the traffic and activity on these honeypots, T-POT can collect valuable data about the tactics and techniques used by attackers, and use this data to improve cyber defenses and threat intelligence.
However, it is important to note that exposing the honeypot services to the internet can also pose a security risk if not properly configured. T-POT includes security measures to help mitigate this risk, such as rate limiting and IP filtering, but it is still important to ensure that the host machine and the Docker containers are properly secured and hardened.
Next, you can see an image of the Architecture of T-POT to understand better how it works.
The ELK Stack
One of the most powerful benefits of using T-POT is the logging, searching and dashboard capabilities provided by the ELK Stack, this transforms T-POT in a flexible tool that provide valuable insight to security threats and can be integrated with other systems in the organization to respond to these threats in real-time. The ELK stack is also highly scalable, making it well-suited for organizations that need to manage large volumes of log data.
The ELK stack is a set of three open-source tools that are commonly used for log management and analysis: Elasticsearch, Logstash, and Kibana. Each of these tools serves a specific purpose and can be used together to create a powerful log management and analysis solution.
Elasticsearch is a distributed search engine that is designed to store and retrieve large amounts of data quickly and efficiently. It is used for indexing and searching log data, and provides powerful querying capabilities.
Logstash is a data processing pipeline that is used for ingesting, processing, and transforming log data. It allows users to collect log data from multiple sources, such as servers, applications, and network devices, and process it in real-time.
Kibana is a data visualization tool that is used for creating dashboards and visualizations based on log data. It allows users to create custom dashboards and visualizations that provide insight into their log data.
You can find more information on how it works in the following link: https://github.com/telekom-security/tpotce/blob/master/README.md
Installing T-POT in Amazon Web Service (AWS)
T-POT can be installed on a variety of platforms, including on-premises servers, virtual machines, and cloud platforms like Amazon Web Services (AWS) and Telekom OTC. However, in this article, we will be focusing on the installation of T-POT on AWS using the Terraform scripts provided by the project. Terraform is an infrastructure-as-code tool that allows users to define and manage their infrastructure using code. By using Terraform, we can automate the process of deploying T-POT on AWS, making it easier and faster to set up and configure a honeypot environment.
The installation will be launched form an Ubuntu machine, that is where terraform will be installed and all the commands to install T-POT in AWS will be issue.
Installing Terraform in Ubuntu 20.04
The first step is to install Terraform to automate the installation of T-POT, to do this please follow the next steps:
- Update your system and install Terraform requirements:
sudo apt-get update && sudo apt-get install -y gnupg software-properties-common- Install the HashiCorp GPG key, to authenticate the HashiCorp apt repository
wget -O- https://apt.releases.hashicorp.com/gpg | gpg --dearmor | sudo tee /usr/share/keyrings/hashicorp-archive-keyring.gpg
- Verify the key’s Fingerprint
gpg --no-default-keyring --keyring /usr/share/keyrings/hashicorp-archive-keyring.gpg –fingerprint- Check that the reported key is the same as the key in https://www.hashicorp.com/security under Linux Package Checksum Verification
- Install the apt repository
echo "deb [signed-by=/usr/share/keyrings/hashicorp-archive-keyring.gpg] https://apt.releases.hashicorp.com $(lsb_release -cs) main" | sudo tee /etc/apt/sources.list.d/hashicorp.list- Update your system again and install terraform with the following command
sudo apt update && sudo apt-get install terraform
- Verify that the installation was successful
terraform -help
- If you don’t receive an error then you installed terraform
You can find more info on how to install terraform in the following link: https://developer.hashicorp.com/terraform/tutorials/aws-get-started/install-cli
Installing AWS CLI in Linux Ubuntu 20.04
Terraform needs to interact with AWS using what in Terraform is known as a provider, the provider uses AWS CLI to send the commands to AWS to create the resources, to install it in Ubuntu 20.04 please use the following steps:
- Download the ZIP file to install from AWS
curl "https://awscli.amazonaws.com/awscli-exe-linux-x86_64.zip" -o "awscliv2.zip"
- Unzip the file
unzip awscliv2.zip
- Run the script to install AWS cli
sudo ./aws/install
- You will need an IAM user with programmatic access to your environment to finish the configuration, please refer to this documentation: https://docs.aws.amazon.com/cli/latest/userguide/getting-started-quickstart.html
- Programmatic access mean that your user will have a “key-id” and a “secret-access-key” to interact with AWS API
- Configure your AWS CLI to use your keys to authenticate to AWS
<pre>aws configure</pre>
- Enter your default region, output, secret access key and key-id when prompted, you can check what was configured by issuing the following commands:
cat ~/.aws/config
cat ~/.aws/credentials
Creating Pre-Requisites in AWS
You will need to create some infrastructure ahead of time to allow the installation of T-POT, you will need to create:
- A VPC (Virtual Private Cloud)
- A Public Subnet
- A SSH Key Name
To create a VPC you will need to login into the AWS Console

Select VPC, or search for it and open it, you will be presented with a screen like this:

Be sure to select the correct region in the top right, in this case we are using “Oregon” that correspond to “us-west-2” region in AWS, click in “Create VPC” and inside select the following:
- Resources to create: Select VPC and more
- Name tag auto-generation: Replace “project” with “t-pot”
- IPv4 CIDR Block: Select a subnet that don’t overlap with other resources if you are already using AWS, in this case use 10.0.0.0/16
- IPv6 CIDR Block: No Ipv6 CIDR Block
- Number of Availability Zones (AZs): 1
- Number of public subnet: 1
- Number of private subnet: 0
- NAT gateways: None
- VPC endpoints: None
- Click in “Create VPC”
Give AWS a couple of seconds to create all the resources, and take note of the following in the screen “Create VPC workflow”:
- The VPC-ID next to “Create VPC”
- The Subnet-ID next to “Create Subnet”
Click in “View VPC” and you will be redirected to the VPC view, check that everything was created correctly. The last resource to create is the “Key pair” to connect to the t-pot host via ssh for management, to do this search in the search field for “key pairs” click in the entry inside the “Features” Section

You will be presented with a screen like the one shown below

Use the following values:
- Name: t-pot-key-pair
- Key pair type: RSA
- Private key file format: .ppk
- Click in “Add new tag”
- Key: Name
- Value: t-pot-key-pair
- Click in “Create key pair”
The .ppk file will be downloaded automatically, please save it because it will be the only way to connect using ssh from an ssh client in your computer, can’t be recovered if lost, you will need to create a new key pair and reconfigure the T-POT host.
Installing T-POT
To install T-POT you need to follow these steps:
- Clone the T-POT github directory with the command:
git clone https://github.com/telekom-security/tpotce.git
- Go to the cloud directory
cd tpotce/cloud/terraform/aws
- You can read about what is going to be installed and how to configure it here: https://github.com/telekom-security/tpotce/blob/master/cloud/terraform/README.md
- Edit the file “variables.tf” and modified the following:
- admin_ip: This is the Ip address from where you will be managing the T-POT Host, this could be your home ip address or work ip address or you can configure any as (0.0.0.0/0) but it is not recommended if this is a production environment
- ec2_vpc_id: The vpc-id gathered from the last section
- ec2_region: Change it to the region that you are using if you choose Oregon then the region should be “us-west-2”
- ec2_ssh_key_name: the name of the key pair configured, if you use the values in the last section this should be: “t-pot-key-pair”
- ec2_instance_type: This is the size of the instance to use, keep in mind that the proposed size is not a free tier and will cost money, check in AWS for the costs associated to run that instance
- ec2_ami: This is the Amazon Machine Image (AMI) to use, because we are using Debian 10, we need to configure the AMI id for that specific OS and region, in order to get the ami id, follow these steps:
- Go to https://wiki.debian.org/Cloud/AmazonEC2Image/Bullseye
- Search for the AMD64 AMI ID for the region us-west-2 and copy the value to the variables.tf file
- timezone: This is the timezone to use, you can modify it or leave it in UTC
- linux_password: This is the password for the Linux user (which is also used on the Admin UI), remove the “#” symbol in the default and change the password
- tpot_flavor: is how T-POT is going to be installed for this case “STANDARD” is correct
- web_user: In case that you want to change the username for the user for the Kibana dashboard
- web_password: the password for the user for the Kibana dashboard, remove the “#” symbol and change the password
- Initialize terraform with:
terraform init
- Create the terraform plan with:
terraform plan -out=output.plan
- You can analyze the plan and see what is going to be created
- Apply the terraform plan created with:
terraform apply output.plan
- Once terraform finish creating the resources you will see an output like this:

- Wait around 10 min for the whole infrastructure to be installed and bootstrapped
- As you can see in the output there are three outputs:
- Admin_UI: Is the webpage that is used to manage the Debian Server, here you can create new users, see the OS logs, the network and keep an eye on the performance of the server
- SSH_Access: This is how you will connect via ssh to the server to manage it, you will have to use putty and use the .ppk file to connect
- Web_UI: This is the link to connect to the Kibana Dashboard
T-POT Admin UI
Once you connect to the Admin UI you have to accept the self generate certificate and you can login with the “admin” user and the password that you setup in the variable “linux_password” and you will be presented with the following screen.

As you can see in the previous image you are viewing statistic of usage of the T-POT host, on the right you see the menu where you can check specifics of any aspect of the host system.
T-POT Web UI
To connect to the Web UI you can use the credentials “webuser” and the password specified in the variable “web_password”.When you connect to it you will need to accept also the self generated certificate and you will be presented with the following screen where you can choose between different tools, we will be focus on the Kibana tool to see the logs generated by the honeypots.

When you click on the Kibana link you will be presented with the following screen where you can select from different dashboards, each dashboard correspond to each honeypot and there is a general dashboard where you can see all the attacks and from where they are coming.

In the search field search for “t-pot” and you will be presented with two dashboards:
- T-Pot Live Attack Map: Where you can see a Live Map and all the attacks that are happening at the moment

- T-Pot: This dashboard is a general historic dashboard where you can see statistics of all the attacks that happened since the server was up

Notice in the last image how many attacks we received in the last hour, this give you an idea on how secure are your digital assets that are exposed to the Internet, they are under constant attack and any vulnerability not patched can be the cause of a security event in no time at all. If you want to scan your digital assets that are exposed to the internet to know if they are vulnerable in a regular basis, you can try out free and paid tools here: https://www.bokehsolutions.com/scanning-services-pricing.html
Destroy the AWS Infrastructure created for T-POT
Any infrastructure created manually you can remove it or destroy it manually by login in in the AWS console, and any infrastructure created with Terraform you need to issue the following command:
terraform destroy
Type “yes” when prompted and wait for Terraform to finish.
Conclusion
In conclusion, T-POT is a comprehensive and effective honeypot solution that provides organizations with valuable insights into cyber threats. By emulating vulnerable systems and services, and collecting data about attacker tactics and techniques, T-POT enables organizations to proactively defend against cyber threats.
The T-POT architecture is designed to ensure security and separation by isolating each honeypot and tool in a container, and using a shared volume to persist all the data used by ELK. Additionally, T-POT provides five groups of services that work together to provide a complete honeypot environment.
In this article, we focused on the installation of T-POT in Amazon Web Services using Terraform scripts provided by the project. By following the steps outlined in this article, organizations can easily deploy T-POT in their AWS environment and start collecting valuable data about cyber threats.
Overall, T-POT is an excellent choice for organizations that want to take a proactive approach to cybersecurity and gain a deeper understanding of the threats they face.